


Eyeliner: A Complete Guide to Types, Styles, Application and Tips
 Khizrana Begum
Beauty & Lifestyle Writer
Khizrana Begum writes clear and reader-friendly content covering beauty, lifestyle and related topics.
Read Full Bio of Author →
Khizrana Begum
Beauty & Lifestyle Writer
Khizrana Begum writes clear and reader-friendly content covering beauty, lifestyle and related topics.
Read Full Bio of Author →
 Sameena Begum
Health, Technology & Digital Content Reviewer
Sameena Begum reviews content for clarity, accuracy and overall reader usefulness.
Read Full Bio of Reviewer →
Sameena Begum
Health, Technology & Digital Content Reviewer
Sameena Begum reviews content for clarity, accuracy and overall reader usefulness.
Read Full Bio of Reviewer →
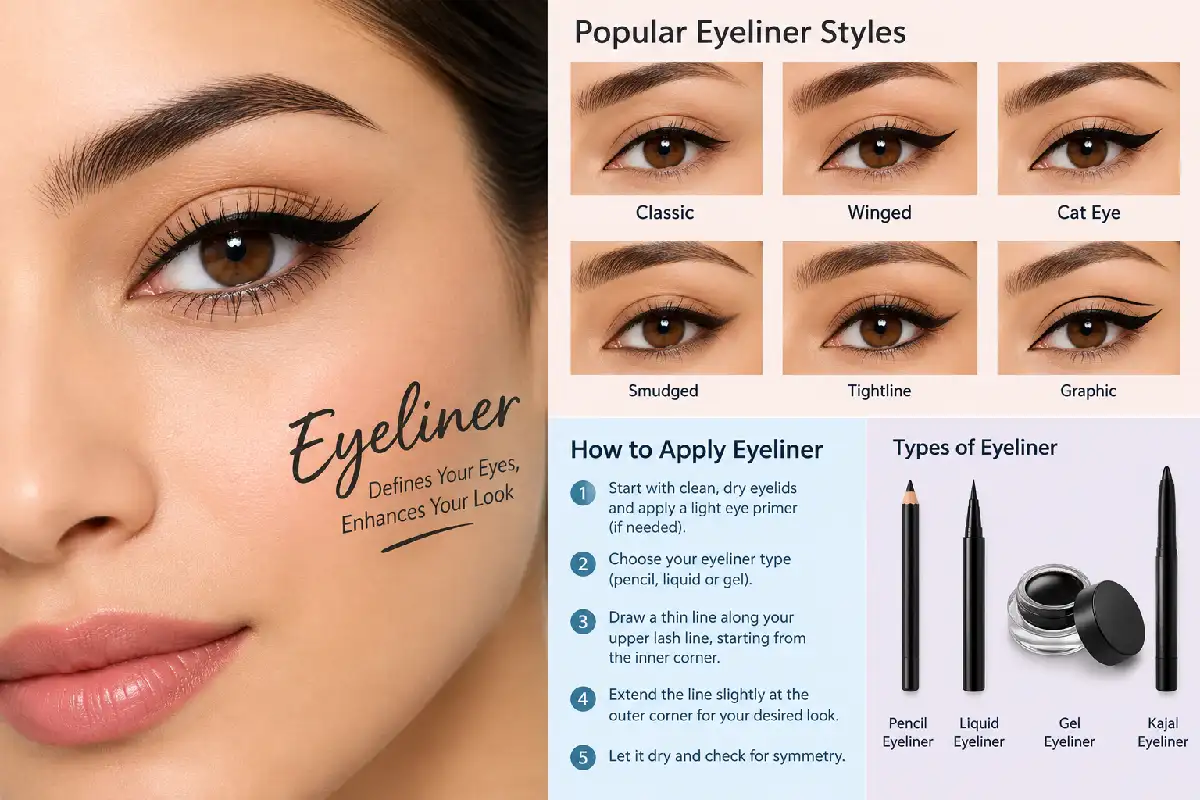
One of the simplest ways of defining one’s eyes and changing one’s makeup look is applying eyeliner. However, whether you’re just looking to wear it every day or create a dramatic winged look, this product will help add definition and symmetry to your eyes. When applying eyeliner, you probably have the most questions about what kinds you need, where to start the line, and how to ensure symmetry.
This article describes the main types of eyeliner, styles, application methods, recommendations for different eye shapes, and common mistakes you may encounter.
What Is Eyeliner?
Eyeliner is a cosmetic used to define the eye area. It may be applied along the upper lash line, the lower lash line, or both. The four general types of eyeliner include pencil, liquid, gel, and felt tip/pencil.
These eyeliners produce different effects. Pencil eyeliner produces a more natural effect, while liquid eyeliner produces a more dramatic and finer effect.
More, the eyeliner is now available in many different colors, so now just pick the one you like.
Different Types of Eyeliner
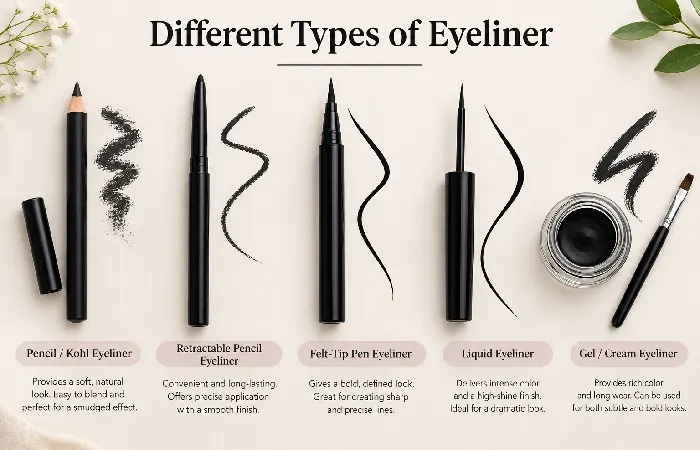
The choice of eyeliner to use mainly depends on your experience, preference, and what effect you wish to achieve.
| Eyeliner Type | Finish | Best For | Difficulty |
| Pencil | Soft to defined | Beginners, everyday makeup | Easy |
| Liquid | Sharp and intense | Wings, dramatic looks | Moderate |
| Gel | Smooth and rich | Smoky and defined looks | Moderate |
| Felt-tip pen | Precise | Quick application and wings | Easy to moderate |
| Kohl | Soft and smoky | Waterline and traditional looks | Easy |
There is no one formula that suits everybody. Your choice can vary with occasions and makeup styles.
Pencil Eyeliner
Pencil eyeliner is among the easiest formulas for starters. The formula gives great control and can be used to create any style ranging from subtle to smoky.
A standard pencil can remian smudged along the lash line and then blended with a cotton bud or small brush. The waterproof pencils are handy when you want your eyeliner to stay put longer, which comes in handy for hot and humid days.
Advantages of Pencil Eyeliner
- Controlled easily
- Convenient for a starter
- Perfect for daily makeup
- Easily smudged
- Offers many color choices
- Convenient for the upper and lower lash lines
If you prefer a natural look during the day, you can use a brown or dark brown pencil.
Liquid Eyeliner
Liquid eyeliner remains formulated for sharp and neat applications. Eyeliner is preferred for making winged eyeliner, cat eyes, and other dramatic makeup.
Due to the fast-drying nature of liquid formulas, beginners find them less forgiving than pencils. Smaller strokes rather than drawing a line can help with application.
Liquid eyeliner is perfect for use where you need a sharp look. A felt-tip liner gives you sharp looks too and is easy for beginners to use.
Gel Eyeliner
The typical gel liner comes in the form of a creamy base and is applied with an angled brush. Gel eyeliner gives you defined lines but can still be blended.
Gel eyeliner can be used where you need to give your eyes a smoky look since it is soft before it sets.
| Feature | Pencil | Liquid | Gel |
| Control | High | Moderate | High |
| Precision | Moderate | High | High |
| Smudging | Easy | Usually difficult after setting | Moderate |
| Beginner-friendly | Yes | Requires practice | Yes with practice |
| Smoky look | Excellent | Limited | Excellent |
How to Apply Eyeliner?
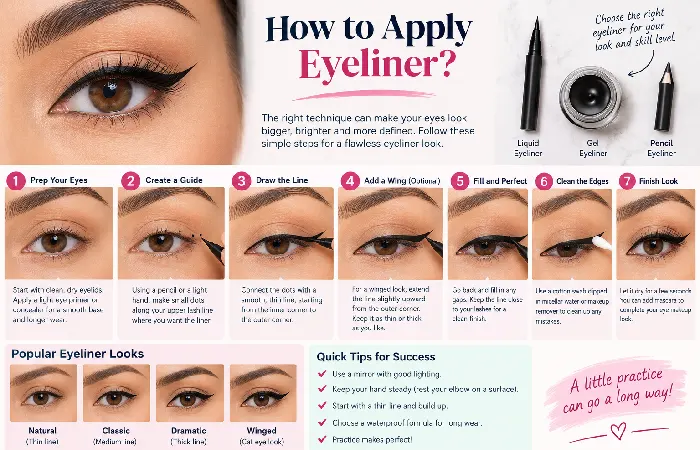
Eyelining can be done better through practice. Ensure that your eyelids are cleaned and prepared properly, and make sure that your mirror is placed comfortably.
Step 1: Prepare Your Eyelids
Put on your normal eye makeup base or apply a small amount of eyeshadow primer, if necessary. This will help give your eyeliner something smooth to work on.
Step 2: Begin Close to Your Upper Lashes
Do not start your eyeliner right away by creating a thick line. Rather, begin near the upper lashes using short but controlled strokes.
Step 3: Gradually Make the Line
Connect the small strokes up to form a line to slightly define thinner at the nest of the eye and slightly thicker at the outer corner of the eye to lift your eyes.
Step 4: Make a Wing
For a winged effect, extend the line just past the outer edge of your brow and blend the tip into the lash line.
Step 5: Inspect Your Eyes
Check both eyes while facing straight ahead, and adjust as necessary, making changes gradually.
Popular Eyeliner Styles
Eyeliner looks can greatly vary.
| Style | Description | Suitable For |
| Classic Line | Simple line along the upper lashes | Everyday makeup |
| Winged Liner | Line extended outward and upward | Defined eye looks |
| Cat Eye | More dramatic lifted wing | Evening and party makeup |
| Tightlining | Applied close to or between upper lashes | Natural definition |
| Smoky Liner | Softly blended eyeliner | Smoky eye makeup |
| Double Liner | Two contrasting or layered lines | Creative makeup |
| Lower Lash Line | Applied beneath the lower lashes | More dramatic definition |
When it comes to everyday eyeliner, using a very fine and classic eyeliner line is easier than wearing one with wings. If you want to experiment with different techniques, these eyeliner makeup techniques can give you a few creative ideas for using eyeliner with other makeup styles.
How to Select an Eyeliner Depending on Eye Shape
Eyeliner doesn’t have to stick to just one type of application method. You can change how you apply it to suit your eye shape.
| Eye Shape | Eyeliner Approach |
| Almond | Most styles can work well; emphasize the outer corner for a lifted look. |
| Round | Keep the line slightly thinner at the inner corner and extend it outward. |
| Hooded | Apply a thinner line and focus definition toward the outer portion. |
| Monolid | Experiment with slightly thicker lines that remain visible when the eyes are open |
| Downturned | Angle the outer wing slightly upward. |
| Deep-set | Avoid making the line excessively thick; focus on controlled definition. |
These are just meant as guidelines, and not technical, solid rules. Remember that makeup is an art and very versatile, and by experimenting and practicing you will see what fits best.
Beginner Eyeliner Tips
Or if you have not had practice with the eyeliner, then simply learn to master your brush or pencil!
- Smaller strokes: It is easier to control smaller lines than a large one.
- Support your elbow: This will limit hand movement.
- Start with thinner: You can always thicken the eyeliner later on.
- Use pencil first: Pencil eyeliner is usually easier to correct than liquid eyeliner.
- Draw your wings separately: You can try small wings before drawing your big wing.
- Have cotton swabs around: It can be useful to clean up small mistakes.
- Look straight ahead: So you will know how eyeliner looks when your eyes are open.
- Avoid tight pulls on your lid: A tight pull will distort the position of your eye so that you won’t be able to tell where to set the end of your liner.
- Sharpen pencils: A sharpened pencil will be easier to work with than a dull one.
- Renew your eye care: Never forget to check the expiry date of the product.
Common Eyeliner Mistakes to Avoid
Not even a seasoned makeup wearer is immune to making errors. Symmetry is not always the main objective, but rather proper and comfortable makeup.
Creating a Line that Is Too Thick
The thick line may conceal a lot of the eyelid space and make the eyes look smaller. Begin with a thin line, then gradually increase the intensity.
Creating One Long Line
An attempt to create one stroke of the liner may result in an uneven application. It is easier to apply with shorter strokes.
Creating Very Long Wings
Too large wings will overshadow other elements of the makeup. Start with a little extension of the line and extend it gradually.
Ignores the Inner Corner
The inner corner of the eye needs a delicate touch. A heavy application here can make the makeup look rough.
Applying Too Much Product to the Lower Lash Line
This has the potential to have a very powerful effect, but perhaps not the most suitable. Use a softer pencil or smudge the line.
Forgets to Compare Both Eyes
Forgot to look at both eyes separately. Step back from the mirror and assess both eyes together.
Final Thoughts
The application of eyeliner can make a basic makeup routine very unique, defining its shape and character. A pencil is an effective initial choice for novices, while there are other choices in terms of liquids and gels available to try out. The perfect technique will depend on the shape of one’s eyes and on one’s preferences.
With some practice, the most difficult styles like winged eyeliner or cat-eye eyeliner will become achievable as well. One should begin with making a basic line and then work up to perfection.