

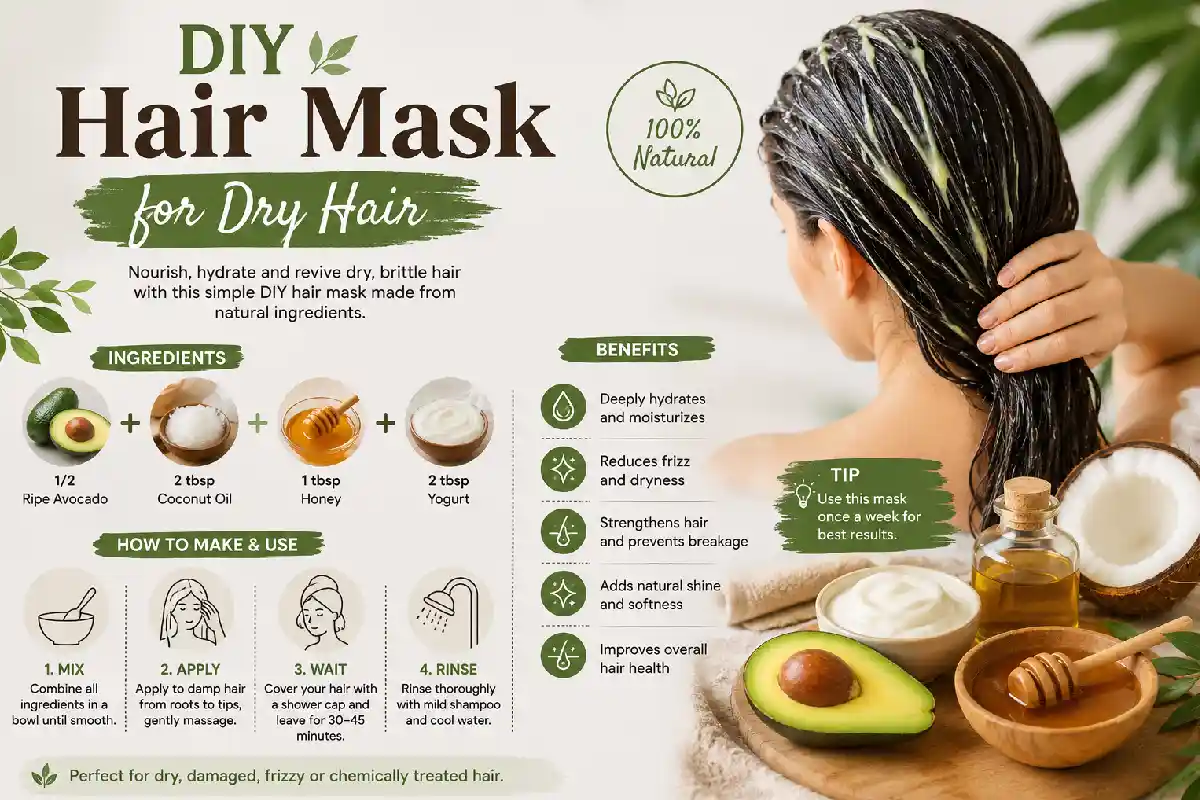
DIY Hair Mask for Dry Hair: The Complete Guide to Naturally Hydrating Damaged Hair
 Khizrana Begum
Beauty & Lifestyle Writer
Khizrana Begum writes clear and reader-friendly content covering beauty, lifestyle and related topics.
Read Full Bio of Author →
Khizrana Begum
Beauty & Lifestyle Writer
Khizrana Begum writes clear and reader-friendly content covering beauty, lifestyle and related topics.
Read Full Bio of Author →
 Sameena Begum
Health, Technology & Digital Content Reviewer
Sameena Begum reviews content for clarity, accuracy and overall reader usefulness.
Read Full Bio of Reviewer →
Sameena Begum
Health, Technology & Digital Content Reviewer
Sameena Begum reviews content for clarity, accuracy and overall reader usefulness.
Read Full Bio of Reviewer →
DIY Hair Mask for Dry Hair: Broke and brittle hair is probably most peoples biggest style-related frustration-and with a whole lot to do with the things you actually do every day-from too much heat styling and irritating shampoos to weather and a lack of healthy moisture (than genetics). Unfortunately getting back hydration and shine has typically requires a big spend at the salon to get. However the truth is you dont need one-just like those big brands and costly Salon treatments, a good quality Do-It-Yourself (DIY) hair mask with only kitchen sink products will take your thirsty hair, remedy broken strands, all in due course of minutes, and bring new life into your hair.
What, how to make and use, the natural key ingredients, step-by-step to use masks, andRecipes for any of your dry hair-types below.
❝
This article is a part of
DIY Hair care Guide
What is a DIY Hair Mask for Dry Hair?
A hair mask can be made as a DIY deep condition treatment from many common and safe natural ingredients, that will actually infiltrate the strands and restore the lost elastic and shine back. Most conditioners merely “top coat” the hair and only condition the outermost layer that washes out fast in order to replenish you dryness. Diy or the store-bought masque can stick on your hair a longer period (around 20 to 60 minutes), so, its components go deeper into the cortex layer of your hair.
All these masks combine with these three different categories of items.
If your hair needs deep nourishment, try this coconut oil hair mask for dry hair to restore moisture and improve softness naturally.
- Emollients – those wonderful butters, creams and oils that trap the good moisture in the hair. Think shea butter, avocado oil, shea butter.
- Humectants – these pull in that good, natural, human moisture that will do all this good stuff for hair, not draw it out and make you look dry as the sahara. Think aloe vera, honey, glycerin.
- Proteins or reconstructors – good for filling those porous spots on hair when it’s damaged so as to not have it looking like a hot mess. Eggs and yogurt and the occasional homemade gelatin treatment will do just the trick here.
DIY Hair masks can be cost-effective, chemical-free way to get rid of dryness without exposing your hair to sulfates, silicones, and artificial fragrances associated with salon brand masks because you can know exactly what you are putting into your hair.
Why does Dry Hair Need Deep Conditioning?
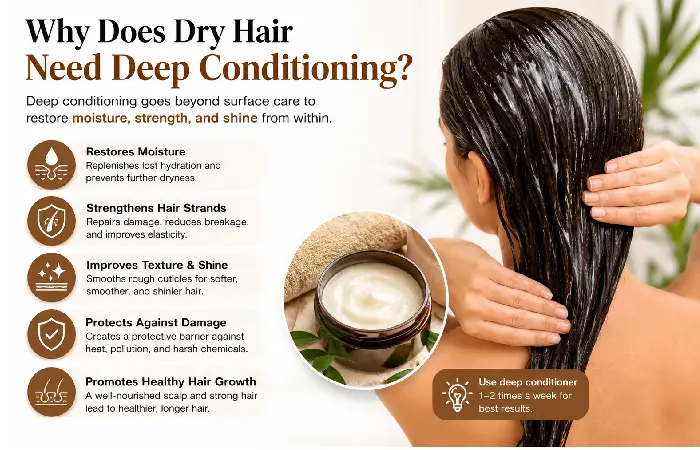
For an extra boost of hydration, make this DIY avocado hair mask packed with healthy fats and vitamins for dry, damaged hair.
Dry hair occurs when hair loses its natural moisture balance; this typically occurs when the hair’s outer layer (cuticle) is stripped or raised, causing moisture to be lost from the hair. Without intervention, it can also hinder the entry of new moisture into the hair strands. Using conditioner as a daily routine won’t cut it; regular conditioner is used to add moisture, not to retain it to the strands.
Using an in-depth hair mask for deep conditioning works as:
- You can leave the ingredients to penetrate deeper in order to repair the strands of hair in the cortex (the deep inner layer of hair) whereas an leave-in product sits on the surface to mask the damages. 2. More nutrients delivery to hair strands as the masks contains richer quantity of oils fatty acids and protein to it as opposed to in-wash/outwash products.
- Heat Application from towel or shower cap may help open cuticle to improve absorption
- Decreased moisture or protein loss will help hair become elastic and reduce the number of broken ends and split ends.
In absence of deep conditioning, dry hair increases in porosity, becoming increasingly brittle and easily broken until a cycle is established that makes the hair appear worse the more it is used.
Common Causes of Dry Hair
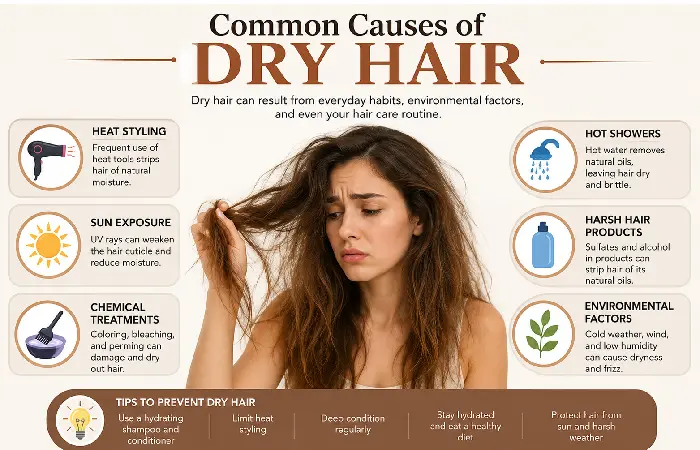
Understanding the source of your dryness will help guide you in your selection of ingredients to use and the frequency of which to apply treatments.
| Cause | How It Damages Hair | Signs to Watch For |
| Heat styling (blow dryers, flat irons, curling irons) | Draws out moisture and breaks down proteins found in cuticle bonds | Frizz & split ends, rough hair texture |
| Chemical treatments (coloring, bleaching, perming) | It affects protein in your hair & raises the cuticle | Brittleness, break, entangle |
| Over-washing or harsh shampoos | Strips of the hair’s natural protection of oils (sebum) | Dull with a straw like texture. |
| Sun and environmental exposure | UV light breaks down proteins and damages natural oils | End colour issues (like fade or yellowing) |
| Hard water | Mineral buildup prevents moisture absorption | Rough feel even after conditioning |
| Nutritional deficiencies | Not enough biotin,omega-3s, iron or protein affects the health of your hair from the roots. | Thinned hair, slowed growth, strands of low thickness |
| Low humidity or cold weather | Helps get rid of moisture from the air & hair | Static, frizz, clingy |
| Chlorine or saltwater exposure | Cuticle dehydrated and scratchy | Chlorine tinge greenish, Stiffness |
You can address specific issues using ingredients best suited to target it – For instance, someone with colour-treated locks benefit from a nourishing, protein rich hair mask, and if your water has a high mineral content and cause hard water build up, first try a purifying hair mask.
If you’re dealing with dull, dehydrated hair, this honey hair mask for dry hair can help lock in moisture and add natural shine.
Benefits of Homemade Hair Masks
In comparison to their retail counterparts DIY or homemade masks boast an array of benefits…
Want a simple homemade treatment? Try this banana hair mask recipe to nourish brittle hair and reduce breakage.
| Benefit | Why It Matters |
| Deep hydration | Natural oils and humectants penetrate deeper than daily conditioners |
| Cost-effective | Ingredients like coconut oil, honey, and eggs cost far less than salon treatments |
| Customizable | You can adjust the recipe based on your specific hair type and concern |
| Chemical-free | No sulfates, parabens, or synthetic fragrances that can irritate the scalp |
| Improves elasticity | Reduces breakage by restoring flexibility to the hair shaft |
| Adds shine | Smooths the cuticle so light reflects more evenly off the hair |
| Reduces frizz | Seals moisture in, preventing the hair from absorbing humidity unevenly |
| Supports scalp health | Many natural ingredients have antimicrobial or soothing properties |
Since these hair masks are created fresh, contain no added preservatives, and should only be used once prepared to reap full benefit
Best Ingredients for DIY Hair Masks
The most important DIY hair mask recipes take into account individual needs Different natural remedies have very different applications – so be sure to use ones known to be most effective for your hair! So whether you need major moisturizing, need protein infusion, a little extra shine, or want a DIY hair mask for frizz, choose from one of our amazing options below.
For smoother, healthier-looking hair, use this olive oil hair mask to combat dryness and tame frizz naturally.
Here are a few hair-restoring gems and what they’re good for.
| Ingredient | Category | Key Benefit |
| Coconut oil | Emollient | Penetrates the hair shaft to reduce protein loss and add deep moisture |
| Avocado | Emollient/Vitamin-rich | Rich in fatty acids and vitamin E to nourish dry, damaged strands |
| Honey | Humectant | Draws and locks in moisture; has natural antibacterial properties |
| Aloe vera | Humectant | Soothes the scalp and hydrates without weighing hair down |
| Yogurt | Protein/Humectant | Mild lactic acid gently exfoliates the scalp while conditioning |
| Egg (whole or yolk) | Protein | Strengthens hair and adds shine; yolk is more moisturizing than white |
| Olive oil | Emollient | Softens hair and helps seal split ends temporarily |
| Banana | Humectant/Vitamin-rich | Potassium and natural oils help reduce breakage and frizz |
| Shea butter | Emollient | Deeply moisturizing, ideal for very dry or coarse hair |
| Argan oil | Emollient | Lightweight oil rich in vitamin E and antioxidants, adds shine |
| Apple cider vinegar | Clarifying/pH balancer | Removes buildup and smooths the cuticle for better absorption |
| Glycerin | Humectant | Attracts moisture from the air into the hair shaft |
Tip: Don’t over do your mask, get it into balance-may be even one humectant, one emollient and the most protein you’ll use is one protein.
How to Choose the Right Hair Mask for Your Hair Type?
However, every hair type may not match each mask’s formulation. Use the Mask Formula 5. Use the correct mask for your hair. If this happens your hair feels brittle, causes excess, your hair may also become too oily. Hair loss is stress induced – the more you panic the more hair may be lost
If your hair feels weak or damaged, this egg hair mask for damaged hair can help strengthen strands with protein-rich ingredients.
| Hair Type / Condition | Best Ingredients | Ingredients to Avoid or Limit |
| Fine or thin hair | Aloe vera, honey, light oils (argan, jojoba) | Heavy butters (shea, cocoa) which can weigh hair down |
| Thick or coarse hair | Coconut oil, avocado, shea butter | Light oils alone, which may not provide enough moisture |
| Curly or coily hair | Avocado, banana, shea butter, honey | Protein-heavy masks used too frequently (can cause dryness) |
| Color-treated hair | Yogurt, honey, aloe vera (gentle, low-heat) | Apple cider vinegar in high concentration (can fade color) |
| Chemically relaxed/permed hair | Egg, yogurt, olive oil for protein and moisture balance | Frequent clarifying treatments, which can weaken already fragile strands |
| Oily scalp, dry ends | Apply mask mid-shaft to ends only; use lighter oils | Heavy oils applied directly to the scalp |
| Extremely damaged/over-processed hair | Egg, yogurt, coconut oil in rotation for repair | Overuse of any single ingredient without variety |
If you’re unsure of what your hair type is, get a basic mask recipe (e.g. Banana, honey & some watered-down coconut milk) going and play around with ingredients if your hair is acting strangely in a few weeks time. Making the Most out of a Homemade Hair Mask There are ways to apply a good recipe so you’ll extract the greatest results.
Check out these easy steps to effectively use it:
How to Apply a DIY Hair Mask Correctly
- Apply onto slightly damp hair-not soaking wet-since the latter tends to dilute the mask, limiting its penetration. Just towel dry your hair post-shampooing, or spritz your dry tresses with water.
2. Segment hair. Use clips to part hair into 4 to 6 sections, so the mask can be applied uniformly-especially if you have thick, luscious locks.
3. Cover middle section up to your ends. They usually the driest, hence deserving additional treatment. However, keep oils such as those contained in this egg, honey and avocado mask away from the roots if you don’t suffer from dry scalp.
4. Comb through a few strokes. Spread the mask evenly throughout your hair using wide tooth comb while detangling your hair with it. - Cover up with a shower cap or warm wrap towel. Heat promotes the softening and opening of the hair cuticles and allows for the greater absorption of the nutrients in your mask.
6. Leave the hair mask on for the specified duration of time, ranging from 20–45 minutes (see table for different masks).
7. Rinse out with normal temperature water. High-temp water may strip beneficial natural oils, whilst overly cold rinse waters may not manage to effectively eliminate products that are oil-based.
8. Wash with conditioner if needed-especially if you’ve used egg- or yogurt-based masks in the recipe. This serves to eliminate any odor and give your strands an extra bit of slip.
9. Air dry instead of blows dried the soonest possible since using any heating appliance over hair after a mask can revert the conditioning effect.
Application Do’s and Don’ts
| Do | Don’t |
| Massage onto clean, wet hair. | Color safe – use on colored hair within 48 hours of treatment |
| Use a wide-toothed comb for allover effect. | Use a comb with teeth that are packed too closely together (smashes hair). |
| Cover hair to retain heat | Remove hair cover allowing hair be freely exposed to air to use less 2 |
| The last item in this section would be thelukewater to wash up. | Rinse with very hot water |
| Test new ingredients first on your skin | Omit a patch test if there’s a history of allergies such as nuts or eggs |
How Often Should You Use Hair Masks?
The answer will, of course, completely and utter depend on where your hair type is at and the kind of ingredients you used in your hair mask of choice!
If you’re using masks that contain a significant amount of protein too often, you could actually be damaging your hair! If not used judiciously (and most especially protein-heavy masks), they may lead to hair being too stiff, and result in brittleness.
| Hair Condition | Recommended Frequency | Mask Type |
| Mildly dry hair | Once every 2 weeks | Light moisturizing mask (honey, aloe vera) |
| Moderately dry or damaged hair | Once a week | Balanced mask (coconut oil, avocado, honey) |
| Severely dry or over-processed hair | 2 times a week (max) | Deep moisture + occasional protein mask |
| Color-treated hair | Once a week | Gentle, sulfate-free, low-protein mask |
| Fine or thin hair | Once every 2 weeks | Lightweight, humectant-based mask |
| Curly/coily hair | Once a week | Rich, emollient-based mask |
Generally you can use moisture masks more often than protein masks. You can’t over-treat with protein treatments, which you should only be using on a 1-2 week basis. You end up with hair that feel firm and dry, rather than soft. DIY Homemade Face Masks: A guide of what NOT to avoid just because an ingredient comes straight from nature doesn’t guarantee it’s the correct option when used in the right combination.
Mistakes to Avoid When Making DIY Hair Masks
- Using protein ingredients too much and too often. While Eggs, Yogurt, and Gelatin are beneficial for repair, over usage leads to protein overload and an uncomfortable dryness instead of a soft feel.
2. Not Doing a Patch Test An allergic reaction could develop to egg, oil or an ingredient in a solution like citric acid.
3. Slapping an oil-heavy mask on an oily scalp. Clogged follicles will prevent healthy hair growth.
4. Using hot water to rinse the hair. You’ll just remove the moisture you just added, resulting in frizzy hair.
5. Leaning a mask in for too long. Acidic substances (e.g., lemon, apple cider vinegar) in certain masks, leave the hair dry.
6. Using old ingredients.DIY hair treatments don’t contain preservatives so fruits like avocado, bananas, and yogurts should not be stored for later use, but used immediately.
7. Inconsistent porosity consideration. While this mask treatment will work on all low-POROSITY hair types; (the kind of hair with tighter cuticle scales which don’t open to take moisture as easily), high-porosity hair will have need to invest on some moisturizing deep treatment mask.
8. Adding too many active ingredients together. Less is more; if you’re adding 5 or 6 ingredients then the hair cannot properly take on the nutrients when rinsing.
9. Not detangling the hair prior to adding the mask. Tangled hair and mask equal uneven coverage; and then difficult and further damaging hair removal.
10. Not moisturizing post-clarifying hair. Ingredients such as ACV have amazing build-up removing properties but should be immediately followed by moisture.
DIY Mask Treatments for Common Dry Hair Concerns
Below you will find targeted treatments for typical dry hair concerns. You may double or even triple recipe amounts depending on the length and thickness of your hair.
| Hair Concern | Recipe | Application Time | Key Benefit |
| General dryness | 2 tbsp coconut oil + 1 tbsp honey + 1 mashed banana | 30 minutes | Deep hydration and shine |
| Frizz control | 1/2 mashed avocado + 1 tbsp olive oil + 1 tbsp honey | 25 minutes | Smooths cuticle, reduces frizz |
| Damaged/over-processed hair | 1 whole egg + 2 tbsp yogurt + 1 tbsp olive oil | 20 minutes | Protein repair and moisture |
| Color-treated hair | 2 tbsp yogurt + 1 tbsp honey + 1 tsp aloe vera gel | 20 minutes | Gentle hydration without fading color |
| Fine, limp hair | 2 tbsp aloe vera gel + 1 tsp honey + few drops jojoba oil | 15–20 minutes | Lightweight moisture without buildup |
| Thick, coarse hair | 2 tbsp shea butter (melted) + 1 tbsp coconut oil + 1 tbsp honey | 40–45 minutes | Intense, long-lasting moisture |
| Curly/coily hair | 1/2 mashed avocado + 1 mashed banana + 1 tbsp shea butter | 30–40 minutes | Definition, moisture, reduced breakage |
| Split ends | 2 tbsp olive oil + 1 tbsp honey + 1 tsp castor oil (ends only) | 30 minutes | Softens and temporarily seals ends |
| Dandruff with dryness | 2 tbsp yogurt + 1 tbsp aloe vera + 1 tsp apple cider vinegar | 20 minutes | Soothes scalp, balances pH |
| Sun/chlorine damage | 2 tbsp coconut oil + 1 tbsp honey + 1 tsp apple cider vinegar | 30 minutes | Restores moisture and removes buildup |
Tips
If you’re using solid oil and butter (like coconut oil or shea butter), melt it just slightly so it blends easily with liquid ingredients.
Make sure to mash fruits thoroughly (like avos or banana) to eliminate potential chunks, which may not rinse out easily of your hair.
Whisk eggs completely before adding anything else-otherwise they’ll ‘cook’ when you add warm oil.
Store leftover masks in the fridge-only if they don’t include eggs or dairy-for a maximum of 24 hours.
Frequently Asked Questions
1. Can I use a DIY hair mask everyday?
No. Overdoing anything can cause issues! If your hair is very damaged, you’ll experience buildup on your hair from oil, the opposite of what you’re trying to achieve with rich moisturizing, oil treatments or so much protein that you end up damaging your hair in new ways. Try one or two times per week for good results based on your hair needs.
2. Do I need to wash my hair before using my DIY hair mask?
Best if applied on towel dried, freshly shampooed hair. This allows ingredients to soak into the fibers without having to fight the dirt, oil, or products already on them.
3. Do I need a DIY hair mask instead of conditioner?
Hair masks provide much more intensive treatment than your average conditioning. Use only once or twice a week instead of conditioner for optimal results. You still need to continue using a lightweight conditioner for the other 5 days in addition to it.
4. My hair feel worse after the protein mask – why?
Protein overload! Your hair just can’t handle so much of it. Cut back on the frequency of the egg or yogurt mask and try a pure moisture-based treatment to help restore balance.
5. Can I wear it overnight?
Not recommended if you’re using perishable ingredients such as egg or fruit. These ingredients can spoil, smell, or generally break down too much.oil-rich mask made with coconut oil (or something similar) should generally be fine for wear.
6. How do I remove that ‘eggy smell’ from my hair after an egg mask?
Wash thoroughly using cool ( never hot!) water so it doesn’t “cook” on your hair or rinse out easily, followed by either diluted ACV rinse and then plain shampoo and conditioner or dilute some lemon or vinegar in with regular hair shampoo and rinse, repeat this procedure 3 times… then condition your hair really well.
7. Are DIY hair masks safe for dyed or highlighted hair?
Yes! As long as you’re not using any potent acidic natural sources like plain lemon juice or highly concentrated forms of diluted ACV, and just stick with the gentle and moisturizing ones like banana and avocado to keep things consistent and balanced from the mask; your hair won’t change too significantly.
8. How long before I see any hair results?
Some results such as softness and shininess will occur after a single use, while the benefits on the dryness and damage will be more visible on those that use DIY masks 4–6 weeks.
9. Is it okay to use natural essential oils?
In very small amounts. If so, typically two to three drops per mask – but be safe and do a spot test on your scalp or in a small section of hair before to avoid potential skin irritations. They add benefit of supporting the scalp. The best-known essential oils to be good for hair care is lavender (most favorite choices), tea tree, and rosemary.
10. What’s a good hair mask recipe for really dry and brittle hair?
A combination of Shea Butter, Avocado and Honey to replenish moisture that is needed most is great for dry andbrittle type of textures to help protect against any breakage, and condition hair to feel more supple and stronger on the long haul; apply this mask to damp hair for around forty to fortyfive minutes for best results while wear a hot towel on your head throughout the process for deeper conditioning.
Final Thoughts
Don’t let brittle, dry hair and damage continually defeat you. By combining certain natural ingredients and applying your DIY mask as recommended, your hair will not only be softer and shinier but eventually repaired, restored and brought back to the way it was; but far healthier without the cost or harsh chemicals used by commercial treatments. With DIY Hair masks and lots of other natural conditioning agents, there no excuse not to keep your hair feeling great…or at the very least, making a significant progress by applying DIY HAİR TREATMENTS!!